
Baking sourdough bread at home has surged in popularity recently. I started experimenting with sourdough baking four or five years ago. A vegan sourdough waffle recipe on my other website attracted many visitors. Then, after baking sourdough bread and serving it at several social events, I started receiving inquires about how I make it. I’m excited to share some of that information here.
Authentic sourdough requires letting the dough sit overnight to ferment and rise. This creates a different flavor and texture than many store-bought breads, which use a quicker process. Some research suggests that the traditional sourdough process makes certain nutrients more easily available to the body, and that the bread may be easier for some people to digest. In addition to enjoying the bread, I also find the process of creating it to be emotionally therapeutic. It helps me to slow down and appreciate a common food item that we often take for granted.
Because sourdough bread making involves natural processes, each loaf is going to be different. While I outline some tips and best practices I’ve discovered, it is not an exact science. Only through practice will you discover which guidelines you should follow more carefully to yield the kind of loaf you enjoy, and which guidelines you can follow more loosely or even disregard.

Several items follow: a video from Breadtopia illustrating the overall process I use, three modifications of a no-knead sourdough bread recipe from that site, information on equipment and special techniques, and information on sourdough starter. Jump to recipe: Fifty-Fifty No-Knead | Forty-Sixty No-Knead | Teff-Wheat No-Knead.
Instructional Video from Breadtopia
The video below, originally posted on Eric Rusch’s Breadtopia no-knead sourdough recipe page, illustrates the process I use. His page now has an updated video and recipe with a slightly different method. Regardless of which method you choose, I recommend reading the text of the Breadtopia page alongside this one, as it has much useful information.

Three Sourdough Bread Recipes
Fifty-Fifty No-Knead Sourdough Bread (50% whole wheat, my current favorite)

Ingredients
1 3/4 cups white bread flour
1 3/4 cups whole wheat flour
1 1/2 teaspoons salt
1/4 cup starter
1 3/4 cups water, roughly room temperature
Directions (see video above for more detail)
Add the flour and salt to a large bowl and stir or whisk until well mixed.
Add the starter and water to a small bowl and whisk until the starter is dissolved.
Pour the dissolved starter and water mixture into the dry ingredients and stir until well blended.
Cover the bowl with plastic and allow the dough to ferment overnight at room temperature, for 9 to 11 hours.
Remove the dough from the large bowl. Stretch and fold the dough and then allow it to proof in a covered bowl for 1 to 2 hours.
Bake 35 minutes covered at 500 F, and then another 8 minutes uncovered at 450 F.
Forty-Sixty No-Knead Sourdough Bread (41.4% whole wheat)

Ingredients
2 cups plus 2 tablespoons white bread flour
1 1/2 cups whole wheat flour
1 1/2 teaspoons salt
1/4 cup starter
1 1/2 cups plus 3 tablespoons water, roughly room temperature
Directions (see video above for more detail)
Add the flour and salt to a large bowl and stir or whisk until well mixed.
Add the starter and water to a small bowl and whisk until the starter is dissolved.
Pour the dissolved starter and water mixture into the dry ingredients and stir until well blended.
Cover the bowl with plastic and allow the dough to ferment overnight at room temperature, for 10 to 12 hours.
Remove the dough from the large bowl. Stretch and fold the dough and then allow it to proof in a covered bowl for 1 to 2 hours.
Bake 35 minutes covered at 500 F, and then another 8 minutes uncovered at 450 F.
Teff-Wheat No-Knead Sourdough Bread
Replacing a small amount of the whole wheat flour with teff flour adds a pleasant flavor that I enjoy. Follow the directions for Forty-Sixty No-Knead Sourdough above, with the following changes:
- Replace 1/4 cup of the whole wheat flour with teff flour (not to be confused with whole teff grain).
- Reduce water to 1 1/2 cups.
Equipment and Techniques
Temperature and Fermentation Times
Fermentation times can vary significantly depending upon exact temperature. Also, recipes with higher whole wheat content have shorter fermentation times. In the U.S. Pacific Northwest winter, we set our thermostat at 63 F at night and 68 F during the day.
I usually place the dough bowls upstairs where it’s a few degrees warmer to ferment overnight before stretching and folding. It’s far from an exact science, but I’ll often allow the dough to ferment for around 11 hours in the winter and around 10 hours in the summer. In many instances, I’ve also allowed dough with more than 50% whole wheat to ferment closer to 12 hours, and still ended up with a delicious loaf, so there’s usually room for variation.
After baking a few loaves, you’ll start to get a better sense of roughly what fermentation times work best for you, and what you can and cannot get away with. You might find that you prefer the taste and texture of loaves fermented longer, or ones fermented shorter.
Flour Substitution
Many people prefer bread flour because its slightly higher protein content results in different baking properties. However, I often use unbleached all-purpose flour in its place and am happy with the results. Try both and see if you have a preference.
Water
I use filtered water to ensure that any microorganism-prohibiting chlorine is removed, but I’ve seen claims that tap water works fine. My understanding is that chlorine also naturally dissipates over time. If the water from the Brita pitcher feels quite a bit below room temperature, I heat it in the microwave for 20-30 seconds to warm it slightly before mixing it with the starter to dissolve it. (Don’t microwave or heat the starter in any way!)
Stretching and Folding Phase
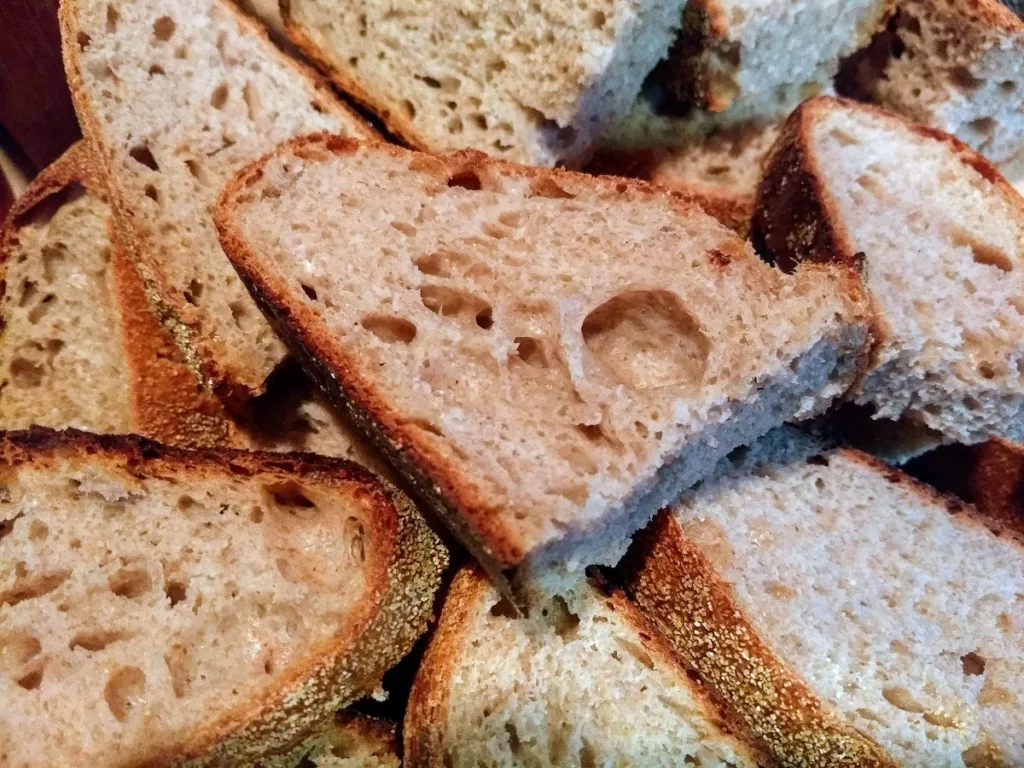
The two recipes above create dough with a fairly high level of hydration. This creates a crumb or interior that tends to have some larger holes. It also means you’ll want to keep your hands and the surface you’re working on well-floured with all-purpose flour, to minimize sticking.
Not every loaf has holes like those below, but several of them have. If this excites you as it does me, you’re in the right place.

Proofing Bowls with Homemade Handles
Many people use proofing baskets. I modified two 8-cup (64-ounce) plastic bowls by putting simple handles on the bottom. The handles are repurposed paper clips, shaped with needle nose pliers. I created holes in the bottom lips of the bowls by heating the end of a paperclip and poking it through the plastic. You could also use a sharp pin, holding it with the pliers if needed.


The handle allows me to turn the dough into the hot dutch oven more easily, and with more control. I can get the bowl closer to the bottom surface when tipping it, which lessens the height and thus the impact velocity of the dough, so it doesn’t lose as much of its retained air upon landing. Also, it makes it easier to keep the top lip of the plastic bowl from touching the very hot surface of the Dutch oven.
Even though the dough still drops several inches into the Dutch oven with a bit of velocity and flattens out some, it usually still gets plenty of rise once it starts baking.

Before putting the dough into the proofing bowl, I spray or rub the entire inside of the bowl with oil, and then coat it with a thin layer of cornmeal, per Breadtopia suggestions. This helps keep the dough from sticking to the bowl, and some of the cornmeal sticks to the outside of the dough. I enjoy the texture it adds to the crust. Rice flour provides a similar effect, but I prefer cornmeal.
While I’ve had good luck with refined coconut oil, I might soon experiment with an oil that doesn’t solidify at room temperature and that has a higher smoke point. Because refined coconut oil starts to break down around 450 F, something like avocado oil might be healthier. Also, it might reduce the small amount of smoke that the baking process creates. The cornmeal might stick even better to a non-solidifying oil. Because I’m using such a small amount of oil for each loaf, oil experimentation hasn’t been a priority.
Update on oil: I’ve also experimented with using coconut oil out of a jar, using my fingers to coat the inside of the bowl. I’ve tried this with just the oil alone, and also with a think layer of cornmeal sprinkled over the whole interior of the bowl after oiling it. I’ve gotten the best results when submerging my plastic proofing bowls into larger bowls of hot water to re-melt the coconut oil just before transferring the dough to the hot Dutch oven.
Avocado oil also works pretty well when also coating the bowl with a thin layer of cornmeal after oiling it. When using it on its own, there can be a tendency for the dough near the very top of the bowl to stick when transferring it to the hot Dutch oven, because the oil slowly settles downward during proofing. It’s not so bad that I advise against it; just know that you may get some sticking near the top when you invert the proofing bowl to transfer the dough.
Dutch Oven

I bake the loaves in a lightly oiled (I use a paper towel to wipe off any excess so it’s a very thin coating) 5-quart cast iron dutch oven with a glass lid, and a bit of cornmeal sprinkled on the bottom.
I usually bake two boules the same day. I mix, ferment, and start both batches proofing at the same time. I bake them one right after the other, allowing the first batch to proof for 1 to 1 1/4 hours. This allows the second to proof for 1 3/4 to 2 hours. Both boules usually turn out fine. Again, you may need to experiment with different fermentation and proofing times, given such factors as the temperature of your dwelling.

Prior to baking the first loaf, I preheat the oven to 500 F with the covered Dutch oven in it. For the second loaf, I just turn the temperature from 450 back up to 500 after the first loaf is done, and put the second one right in. It usually takes only a few minutes to get back up to full temperature. I don’t add any more oil to the Dutch oven for the second loaf; I just sprinkle in a little more cornmeal.
I set my phone timer in addition to the oven timer, so I can get things done elsewhere outside the kitchen.
Since I first wrote this post, I’ve obtained a second Dutch oven. There’s just enough room in the oven to fit both of them, and that works well. Also, I’ve realized it’s not necessary to sprinkle cornmeal on the bottom of the Dutch ovens; I just make sure they are very lightly oiled.
Scoring and Water Spritzing
When starting out, I usually tried to score the top of the dough with a razor cutter just before baking. I no longer do this. However, I do spritz the top of the dough with several pumps of a sprayer set to a fine mist just before baking, as it seems to make the crust slightly smoother.
Cooling and Cutting
I’m big on repurposing items when possible, so I use the rack out of the toaster oven and a metal vegetable steamer for cooling racks. While I sometimes have difficulty waiting for the bread to cool, I usually follow others’ suggestions to let it sit for around two hours before cutting.
Storage
After cutting the boule, I put the slices into plastic bags and store them in the freezer. Each morning, I heat up a few slices in the toaster oven for breakfast–just enough to thaw them and toast them very lightly. I enjoy topping them with melted chocolate chips, nut butter, and cinnamon. I sometimes also put a few pieces in a sealable container and leave them on the counter, so there are a few fresh pieces to nibble on.
Sourdough Starter: Your Bubbly Friend

What is sourdough starter?
Starter is a blend of flour and water that’s initially left out for several days, and “fed” with additional flour and water until the natural yeast in the environment begins to populate it and make it bubbly. It can then be maintained in the fridge and used to create bread with nothing more than the starter, flour, water, and salt. Or, it can be used for other baked goods, like waffles, cookies, etc.
Creating or obtaining a starter
Start by asking friends and neighbors if anyone has sourdough starter. You can also order starter from sites like eBay, where you’ll find varieties such as “The Beast,” which has some humorous photos. Or, you can make your own, if you’re willing to wait at least a week before you’re able to bake bread.
To create my sourdough starter, I used the directions from King Arthur Flour’s site. I used 1/2 cup all-purpose plus 1/2 cup whole wheat flour in the very first step to get it started, and then just all-purpose after that. I often use what our neighborhood store (WinCo) sells in its bulk section as “unbleached flour.” If you don’t want to waste as much flour in the beginning, you can experiment with halving all the amounts. Note that no refrigeration should be done while you’re getting the starter established.
Maintaining the sourdough starter
Once your starter is established, you can store it in the fridge, covered in a container that holds in the moisture but has a tiny hole in the lid for air to escape. This slows down the fermentation process so that it doesn’t need to be fed every day. This makes sense for those of us who bake only once per week or so.
Since my starter has been established, I now remove all but roughly 1/4 cup of starter from the storage container. What’s removed is used for baking, given away, or discarded in the composter. To the remaining starter in the storage container, I then add around 1/4 cup filtered water (room temperature or cooler) and around 1/2 cup of all-purpose flour. I do this process once every week if I’m baking frequently, or once every two weeks if I’m baking less often.
Adjust the water and flour amounts slightly if needed so the mixture is thin enough to be stirrable but thick enough to be difficult to pour. It helps to stir the existing starter and fresh water together first before stirring in the fresh flour. A chopstick or small spatula can be useful for this. Just make sure your stirring tool has no soap residue on it. Also, the storage container should be at least twice the volume of the starter, to allow it room to expand.
If you’re feeding your starter only once every two weeks or less, you can leave less than 1/4 cup of starter in the storage container before adding the fresh water and flour. That leaves less yeast to feed on the new food you’ve just provided, allowing it to go a bit longer between feedings.
I’ve kept starter in the refrigerator for extended periods while feeding it only once every two to three weeks, but have never tried going longer between feedings. If you don’t plan to bake at least once a month, or need to take a break from baking for a while, consider freezing your sourdough starter for a while.
Prepping the starter for making dough
As noted above, storing starter in the fridge makes it easier to maintain for those who don’t bake every day. However, this means that the starter culture may need a few hours to become fully active again after you remove it from the fridge.
I’ve found that if I take starter back out of the fridge around a week (give or take a few days) after its last feeding, it’s not always necessary to feed and let it sit out at room temperature to “bring it back to life” before using, as some suggest. I sometimes just measure out what I need for the dough and put it right to use.
However, I get more consistent results when I feed the starter and let it sit out several hours just before use. Here’s how I do that.
If I have roughly 3/4 cup (after being stirred down) of unfed starter that’s been sitting in the fridge for close to a week, I’ll take it out of the fridge anywhere from 4 to 7 hours before I plan to make the dough. I feed it by stirring in about 1/3 cup filtered water at room temperature and then roughly 1/2 cup unbleached all-purpose flour. (No need to discard any starter at this time.) I let the starter sit at room temperature so it becomes very bubbly and active. It may double in size. You can test it for readiness by dropping a small amount in water to see if it floats. It doesn’t need to be exactly at its “peak,” and factors such as home temperature and thickness of the starter can create a lot of variation. Experiment and see what works best for you.
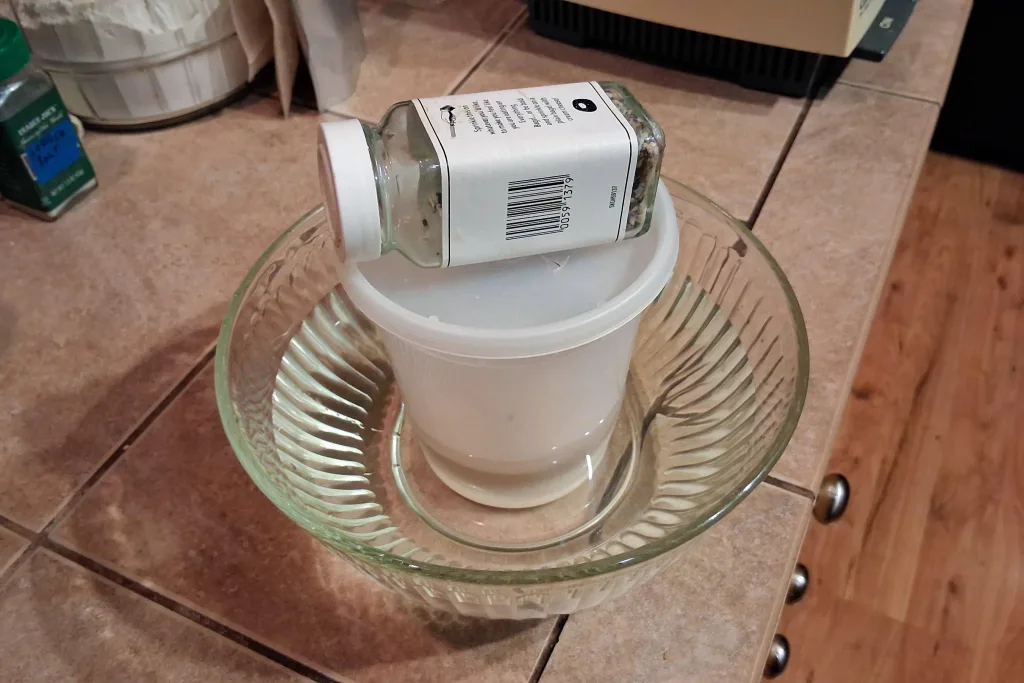
I’ve also had success taking the starter out of the fridge only around 3 hours before I plan to make the dough, stirring in lesser amounts of water and flour (a scant 1/4 cup filtered water and around 1/4 cup all-purpose flour), and then placing the starter container into a bowl of very warm tap water to give the fermentation more of a boost. If you do this, don’t fill the water bowl so high that you risk flooding your starter container. You may also need to put a weight on top of your plastic starter container lid to keep it from bobbing up in the water and turning sideways.
When it’s time to make dough, I stir down the starter and measure out what I need. I then discard (or find another use for) any remaining starter beyond roughly 1/4 cup. I feed that remaining 1/4 cup of starter by stirring in roughly 1/4 cup filtered water at room temperature and then roughly 1/2 cup unbleached all-purpose flour.
Just after feeding, I usually let the starter sit on the counter for around half an hour–while I’m making dough and doing any cleanup–before putting it back in the refrigerator. Some suggest that this helps the fermentation to get going again. However, I’m not always able to do this, and I haven’t noticed a significant difference when I haven’t.
Additional sourdough starter resources
Note that the rough timelines above may vary for you, depending on factors such as the temperature of your refrigerator. Breadtopia also has instructions on managing sourdough starter, including the video below.

Happy sourdough bread baking!
I love this blog, and my bread turned out perfectly! I just ordered a bread cloche! Very excited to try it with my next batches. Thanks for your great work!
You’re very welcome, and thanks for the kind words. I’m glad to hear it turned out. I hope your future sourdough bread adventures are fun and delicious!